Configuring the Look
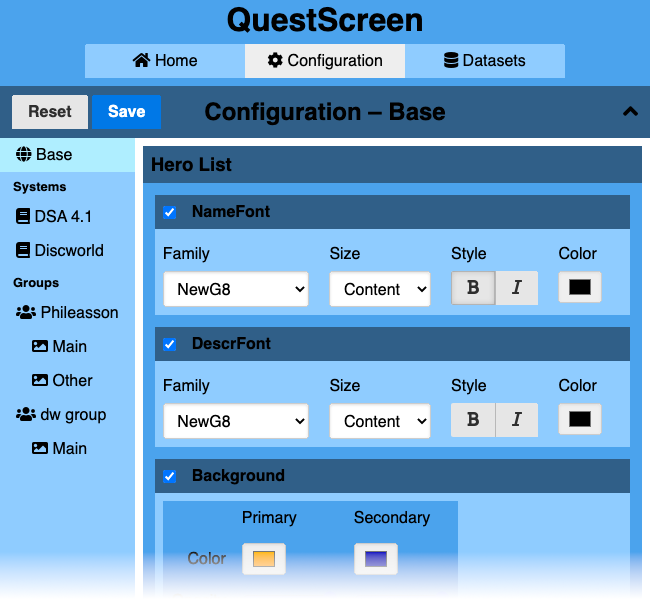
The Configuration page lets you configure the look of your modules. It looks like this:

Just like on the Datasets page, you have four layers in the sidebar: Base, the systems, the groups, and the groups’ scenes.
However, in the configuration, each tab looks very similar since you always configure the same set of values of your modules.
In the main area, you see a list of all modules that provide configuration. The configuration of a module is split in configuration items that can be selected or unselected via checkboxes.
Whenever you check a configuration item, you override this item’s values. The value precedence is default - base - system - group - scene. So if you enable a configuration item for a group, you override a value that could come from a system, the base, or the set of default values. The value can be overridden again in a scene of that group.
In other words, a module will for each configuration item take the most specialized value available. So assuming you are on a certain scene, the module will first look at the scene’s configuration for item values, then in the current group’s configuration etc. Whatever item values are found define how the module is rendered.
This hierarchical system is used to enable you to define a look for all groups using a certain system. This could be useful for example if you have a system with a medieval/fantasy setting, where you would rather use natural colors and textures, and another system with a sci-fi/cyberpunk setting, where you would rather use neon colors and futuristic textures. If you need to adjust the look for a certain group, you can then just override the values inherited from the system.
When you edit configurations, the page will indicate which values you have edited. You need to Save the edited values with the button in the top bar; otherwise the edits will be discarded when you leave the page. Reset will simply undo all unsaved edits. If you are currently running a session, saving the configuration will re-render the screen, possibly applying changed configuration values. There is no animation for this transition since it is not designed to be used during an actual session; but you can have a session active while modifying the configuration to see how it will look.
In the base modules, there are two different configuration items available for several modules:
-
Modules that display text allow you to configure how the text is rendered. This includes setting the font, font variant and color. QuestScreen defines five font sizes that scale with the screen size.
If you want to use different fonts, you must put them in the
fontsdirectory inside the data directory. QuestScreen is able to consume TTF and OTF fonts. You can add fonts that miss some of the style, e.g. it is no problem if a font does not have a bold italic variant available. The configuration page will always let you set any style, but will fall back to a different style if the selected style is unavailable. -
Modules that render something on a background canvas allow you to configure how this background canvas is filled. QuestScreen allows you to fill the background either with a single color, or with two colors that are merged with a texture. A texture is a grayscale image where white selects the first color, black selects the second color, and the gray tones in between merge the two colors depending on the amount of white (more white = more first color).
Textures ought to be repeatable both horizontally and vertically. This is not required if the texture is larger than the screen.
QuestScreen comes with a standard font, NewG8, which is based on the GaramondNo8 font. It also comes with a standard texture paper.
Plugins may define additional types of configuration items, consult the plugin’s documentation for how they work.